
Barbell Bent Over Row vs Chest Supported DB Row
Both are pulling movements. Both target the back. But they train it in fundamentally different ways — and knowing which one belongs in your programme, and when, is the difference between a complete back and a stalled one.
The barbell bent over row and the chest supported dumbbell row are two of the most popular back exercises in existence, yet they represent almost opposite ends of the rowing spectrum. One is a full-body strength movement. The other is a pure muscle isolation tool. One builds strength and coordinates the entire posterior chain. The other removes every variable except the muscles you actually want to train.
This article breaks down everything you need to know about both — technique, muscle activation, advantages, limitations, and exactly when to use each one.
Bilateral Barbell row — both arms move together under heavy load
Zero Chest supported row — zero momentum, zero lower back demand
Both target lats, rhomboids, traps and rear delts — but differently
At a Glance
Barbell Bent Over Row
Heavy compound — full posterior chain
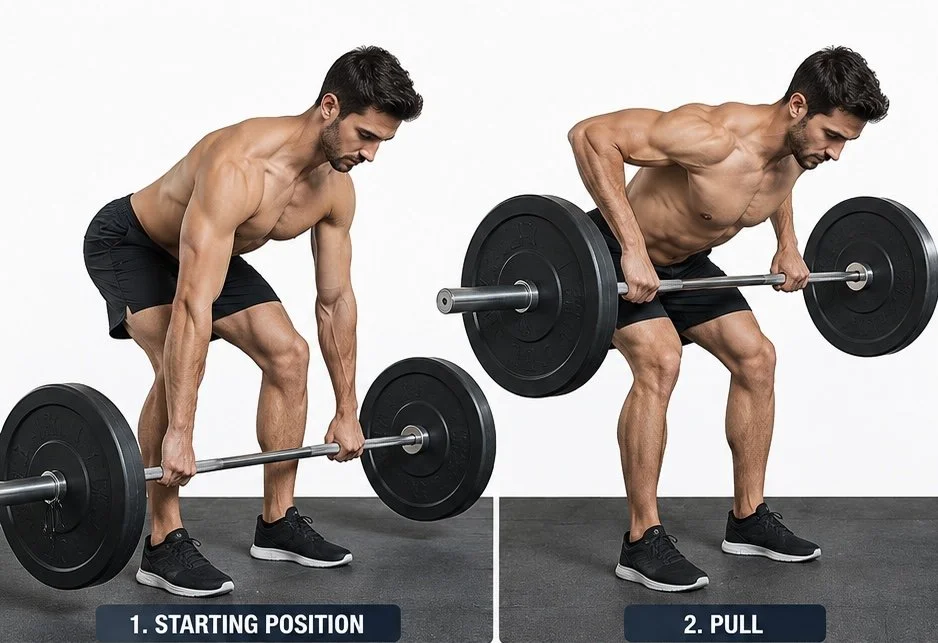
Bilateral movement — both arms row simultaneously
Standing, hinged position loads the entire posterior chain
Allows the heaviest loading of any row variation
Significant erector spinae and core demand
Greater strength and neural adaptation potential
Momentum can reduce isolation if form breaks down
Requires solid hip hinge mechanics and lower back strength
Chest Supported DB Row
Isolation movement — pure back stimulus
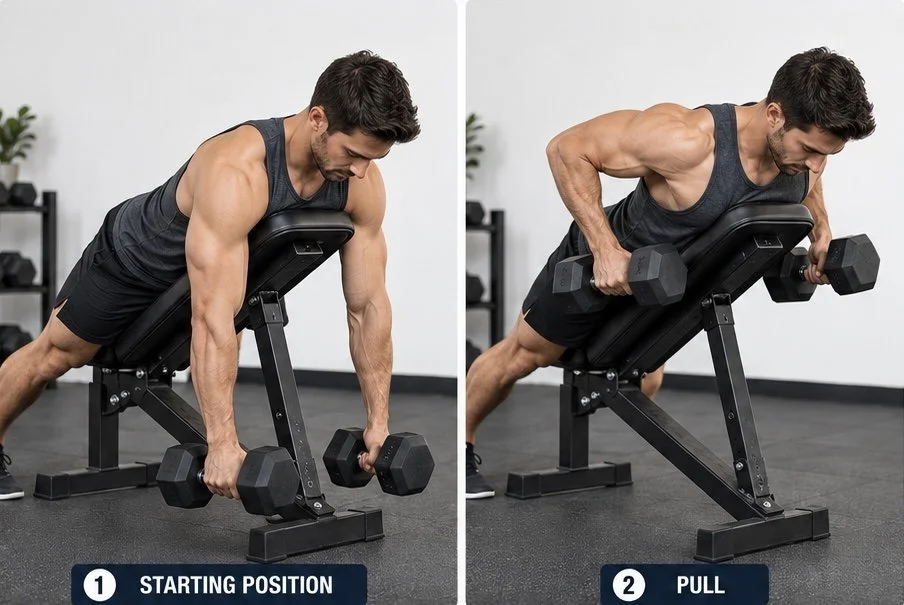
Chest rests on an incline bench — spine is fully supported
Eliminates momentum and lower back involvement entirely
Each arm works independently — fixes imbalances
Maximum lat and mid-back isolation per rep
Safer with fatigue — form holds even at the end of a set
Limited by dumbbell availability rather than full-body strength
Ideal for pure hypertrophy and high-rep work
Muscles Worked — How They Differ
Both exercises train the same primary back muscles, but the degree of activation, the secondary muscles involved, and the positions in which muscles are loaded differ significantly.
BOTH EXERCISES — PRIMARY
Latissimus Dorsi
The broad back muscle responsible for pulling the arm down and back. Heavily worked in both variations — the main target of any rowing movement.
BOTH EXERCISES — PRIMARY
Rhomboids & Mid Traps
Responsible for scapular retraction — pulling the shoulder blades together at the peak of the row. Heavily loaded in both, but more isolated in the supported version.
BOTH EXERCISES — SECONDARY
Rear Deltoids
The posterior shoulder head assists in elbow drive and horizontal shoulder extension. Activated in both — more effectively targeted with a wider elbow flare.
BOTH EXERCISES — SECONDARY
Biceps & Brachialis
Assist with elbow flexion on every rep of both exercises. A limiting factor in high-rep sets — the arms fatigue before the back in some lifters.
BARBELL ROW ONLY
Erector Spinae
The lower back muscles work isometrically throughout the barbell row to maintain the hinged position. This is both a strength benefit and a fatigue risk — the erectors can give out before the back muscles do.
BARBELL ROW ONLY
Glutes & Hamstrings
Maintain hip position in the hinge. Under sustained isometric tension throughout the set — adding to the full-body training effect of the barbell row that the supported version doesn't provide.
CHEST SUPPORTED ONLY
Greater VMO Isolation
Because the chest is supported, the back muscles work in true isolation — no compensations, no energy diverted to maintaining posture. Each rep is 100% back and arms.
CHEST SUPPORTED ADVANTAGE
Independent Arm Action
Dumbbells allow each arm to move freely, correcting the side-to-side imbalances that barbell rowing often conceals. The weaker side is forced to work fully rather than being compensated for by the stronger.
Barbell Bent Over Row — Technique
01
Set the Hip Hinge
Stand with feet hip-width apart, bar over mid-foot. Hinge at the hips until your torso is roughly 30–45° from horizontal — not fully parallel to the floor, not upright. Think of it as the top of a deadlift, held. Maintain a neutral spine throughout.
02
Grip and Brace
Grip the bar just outside your legs — pronated (overhand) for greater upper back emphasis, supinated (underhand) for more bicep and lower lat involvement. Take a deep breath, brace your core hard, and tuck your chin slightly. This position must hold throughout every rep of the set.
03
Drive the Elbows Back
Initiate the pull by driving your elbows toward the ceiling — not by pulling with your hands. Think "elbows to the ceiling" rather than "pull the bar to my chest." This mental cue activates the back muscles first and prevents the biceps from dominating the movement.
04
Pull to the Lower Chest or Navel
Depending on your torso angle and grip, the bar should contact your lower chest (more upright torso, overhand grip) or your navel area (more horizontal torso). At the peak, squeeze the shoulder blades together hard for one second before lowering with control.
05
Lower Under Control
Resist the temptation to drop the bar. Lower in 2–3 seconds to full arm extension, allowing the shoulder blades to protract (move apart) at the bottom. This full range of motion — stretch to contraction — maximises the hypertrophic stimulus.
Chest Supported DB Row — Technique
01
Set the Bench Angle
Set an adjustable bench to roughly 30–45°. A steeper angle emphasises upper back and rear delts; a shallower angle shifts focus toward the lats. Experiment to find what you feel most. Ensure the bench is stable and won't move during the set.
02
Position Your Chest Firmly
Lie chest-down on the bench with your sternum supported. Your feet should rest flat on the floor for stability, legs slightly wider than the bench. Let your arms hang fully extended below the bench with a dumbbell in each hand. Your neck should be in a neutral position — look down, not forward.
03
Choose Your Grip Position
Neutral grip (palms facing each other) emphasises the lats and reduces elbow stress — the default starting point for most lifters. Pronated grip (palms facing away) increases rhomboid and rear delt recruitment. Both are valid; the neutral grip is generally more comfortable and effective for hypertrophy.
04
Row Simultaneously or Alternating
Both arms can row at the same time (bilateral), or you can alternate arms for greater range of motion per side. Bilateral allows heavier loading; alternating allows a longer stretch phase on each rep. Either is effective — choose based on your goal and what you feel more strongly in the target muscles.
05
Full Stretch at the Bottom
Because the chest is fully supported, you can allow a complete stretch at the bottom of every rep — shoulders forward, arms fully extended — without any postural breakdown. This stretch-mediated loading is the chest supported row's greatest advantage over the barbell version. Don't cut it short.
Common Mistakes — Both Exercises
Mistake
Barbell row: torso rising on every rep. Using the hips and lower back to jerk the bar up on each rep converts a back exercise into a lower back exercise and increases injury risk dramatically. The hinge position should be held rigidly throughout the entire set — the arms and back do the work, not the hips.
Fix
Reduce the weight and hold the hinge.If your torso is rising, the weight is too heavy for your current lower back strength and hip hinge stability. Reduce load until you can complete every rep without postural breakdown. The hinge position is non-negotiable.
Mistake
Chest supported row: cutting the range of motion short. Not allowing full arm extension at the bottom defeats the entire purpose of the supported setup. The support is there so you can safely reach full stretch on every rep. A half-range supported row is worse than a full-range barbell row.
Fix
Use lighter weight and prioritise the stretch. Drop the dumbbell weight until you can comfortably hang fully extended at the bottom of every rep. Feel the shoulder blades protract and the lats lengthen. That stretch is what makes this exercise uniquely valuable.
Mistake
Both exercises: pulling with the arms, not the back. If the biceps fatigue before the back, the arms are leading the movement. This is one of the most common rowing errors and it limits both back development and the loads you can use over time.
Fix
Think "elbows, not hands." Before every set, remind yourself: drive the elbows back, not the hands up. Imagine trying to touch your elbows behind your back. This mental cue shifts the primary mover from the biceps to the back muscles and dramatically improves back activation.
Cue — Barbell
"Protect the arch, drive the elbows." One cue for the two most important form points: maintain your lumbar position and lead the pull with the elbows. Say it before every set.
Cue — DB Supported
"Hang and squeeze."Full hang at the bottom, maximum squeeze at the top. The two positions that define the quality of every rep. No partial ranges, no rushed transitions.
Head-to-Head Comparison
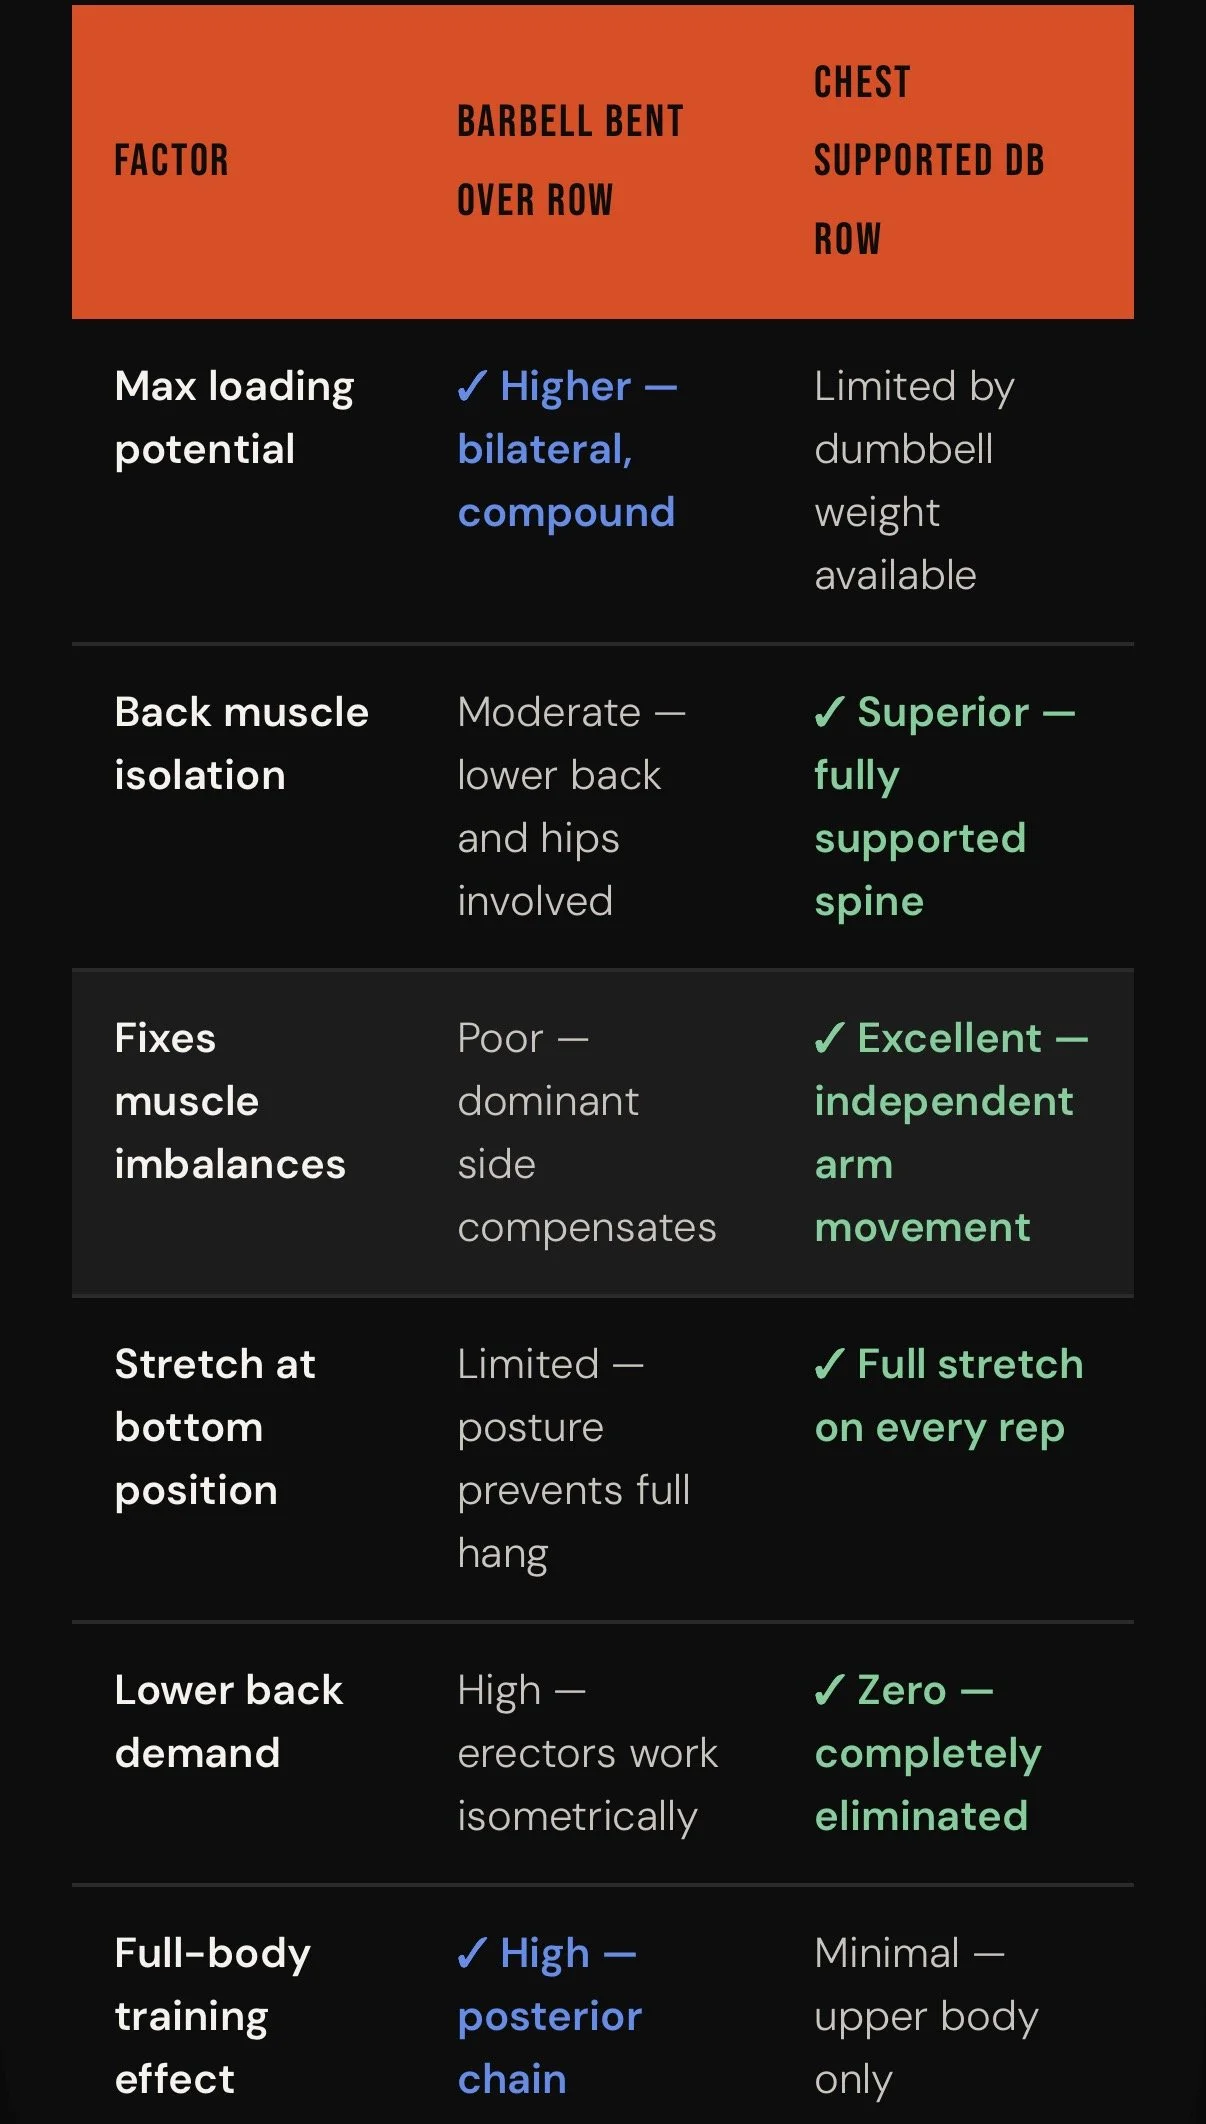
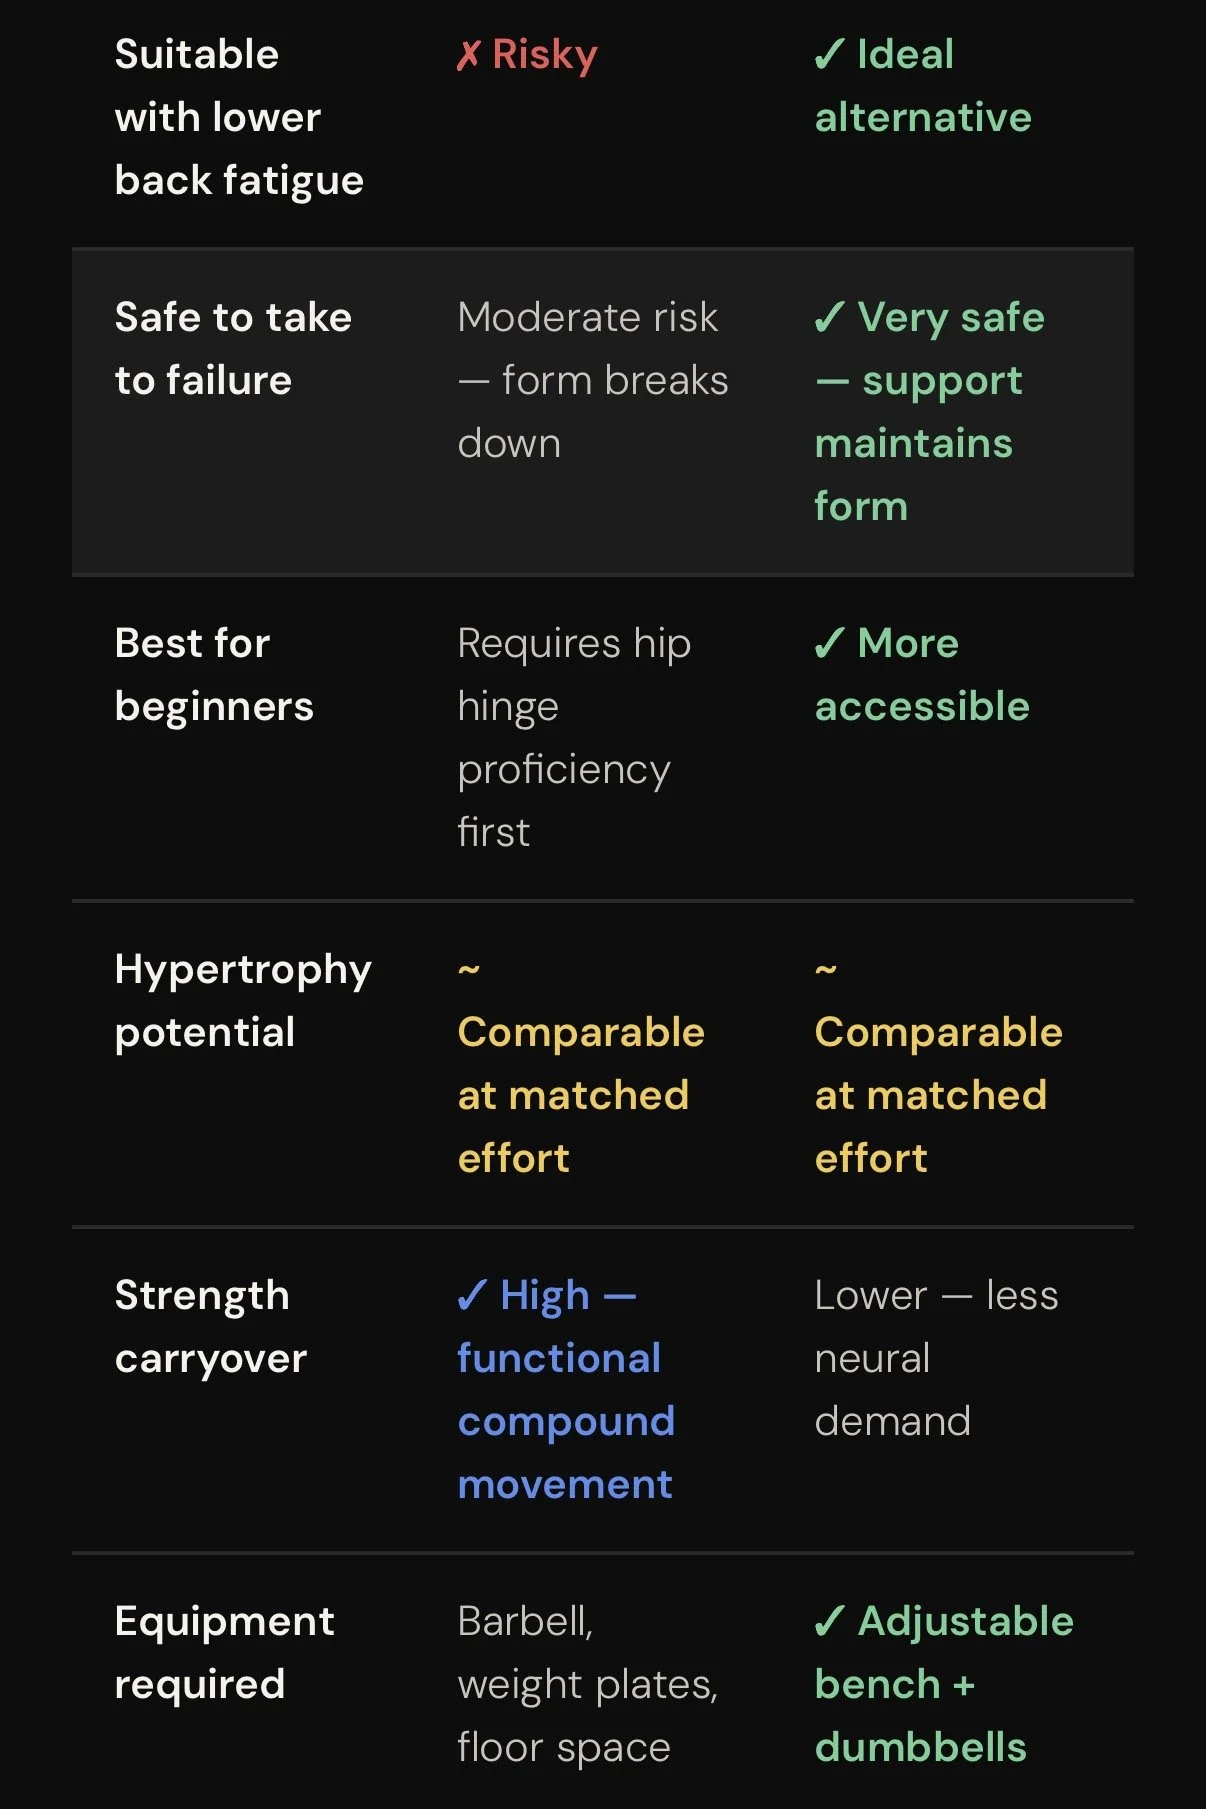
Which One Should You Use?
Choose the Barbell Row When...
Building raw pulling strength is a primary goal
You want to develop the full posterior chain in a single movement
Your lower back is healthy and your hip hinge is solid
You want maximum loading and progressive overload potential
Your programme needs a heavy compound pulling movement
You're in a strength-focused training block (low reps, heavy weight)
Choose the Chest Supported Row When...
You want maximum back isolation without lower back fatigue
You have a history of lower back issues or current soreness
You want to identify and address left-right muscle imbalances
You're in a hypertrophy block and want to take sets to true failure
Your lower back is already fatigued from deadlifts or squats
You want a longer stretch position for enhanced muscle development
The honest answer:
You don't have to choose. The most complete back programmes use both. The barbell row builds strength and thickness through heavy compound loading. The chest supported row isolates, corrects imbalances, and delivers pure hypertrophic stimulus. Run the barbell row early in your session when you're freshest. Follow it with the supported row to exhaust the target muscles without spinal fatigue becoming the limiting factor.
The Verdict
The barbell row builds strength. The chest supported row builds isolation and corrects imbalances. Use both — heavy first, supported second. Your back will be better for it.